
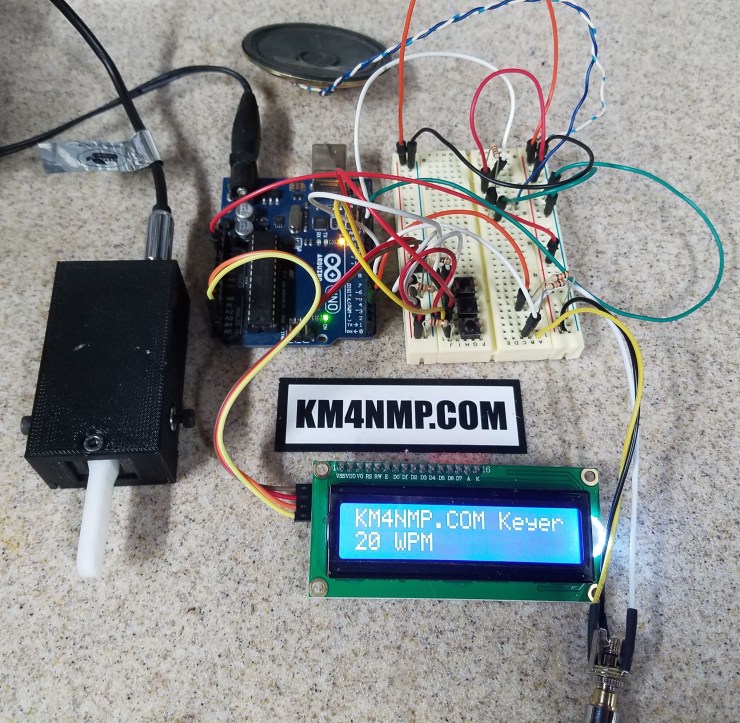
The Basic Arduino Keyer is a great project but was purposely designed to have no frills. This week we will be adding an adjustment for speed and a LCD. For speed adjustment, there is 2 buttons. One is for words per minute up and the other is words per minute down. As you change the speed it is displayed on the LCD. Since buttons were being added an extra was installed for a memory. The memory is very basic and just sounds KM4NMP in morse code. This can be commented out or changed to your call sign.

//Basic Arduino Keyer 6/9/19
//https://MacarrLabs.com/
//https://KM4NMP.com/
//LCD and speed adjust added 6/15/19
//Memory Button added 6/16/19
//Author Matthew Carr KM4NMP
//common plug pin outs are:
//  Tip – left lever, or left side of single lever, normally Dot
//  Ring – right lever, or right side of single lever, normally Dash
//  Shaft – common
//Libraries
#include <Wire.h>
#include <LiquidCrystal_I2C.h>

LiquidCrystal_I2C lcd(0x27, 2, 1, 0, 4, 5, 6, 7, 3, POSITIVE);  // Set the LCD I2C address
int UpButton = 4;
int DownButton = 5;
int LeftPin = 2;  //left paddle push pin
int RightPin = 3; //right paddle push pin
int memoryButton = 6; //memory button pin
int memoryButtonState = 0;
int DownButtonPinState = 0;
int UpButtonPinState = 0;
int LeftPinState = 0;
int RightPinState = 0;
int audio = 12;   //audio out pin
int note = 600;   //note pitch change for a difrent tone
float dotTime;
float dotTimeSec;
float dashTime;
int WordPerMin = 10; //sets words per minute at 10 to start
float CharPerMin;
void setup() {
  Serial.begin(9600);        //for debugging
  pinMode(UpButton, INPUT);  //set pin as input
  pinMode(DownButton, INPUT);  //set pin as input
  pinMode(LeftPin, INPUT);   //set pin as input
  pinMode(RightPin, INPUT);  //set pin as input
  pinMode(memoryButton, INPUT);  //set pin as input
  lcd.begin(16,2);
  lcd.backlight();   // Turn on the backligt  lcd.noBaklight() to turn it off
  lcd.setCursor(0,0);
  lcd.print("KM4NMP.COM Keyer");
  lcd.setCursor(2,1);
  lcd.print("*KM4NMP.COM*");
  WordPerMin = 10;
  CharPerMin = WordPerMin * 50;
  dotTimeSec = 60 / CharPerMin;    //dot time in seconds
  dotTime = dotTimeSec * 1000;
  dashTime = dotTime * 3;
  delay(1500);
  lcd.clear();
  lcd.print("KM4NMP.COM Keyer");
  lcd.setCursor(0,1);
  lcd.print("MacarrLabs.com");
  delay(1500);
  lcd.clear();
}

void loop() {
  //Read the state of the inputs
  LeftPinState = digitalRead(LeftPin);
  RightPinState = digitalRead(RightPin);
  UpButtonPinState = digitalRead(UpButton);
  DownButtonPinState = digitalRead(DownButton);
  memoryButtonState = digitalRead(memoryButton);


  if (UpButtonPinState == 1) {
    WordPerMin = WordPerMin + 1;
    lcd.clear();
    lcd.setCursor(0,0);
    lcd.print("KM4NMP.COM Keyer");
    lcd.setCursor(0,1);
    lcd.print( WordPerMin );
    lcd.print(" WPM");
  }
  if (DownButtonPinState == 1) {
    WordPerMin = WordPerMin - 1;
    lcd.clear();
    lcd.setCursor(0,0);
    lcd.print("KM4NMP.COM Keyer");
    lcd.setCursor(0,1);
    lcd.print( WordPerMin );
    lcd.print(" WPM");
  }
  if (WordPerMin < 5){
    WordPerMin = 5;
    lcd.clear();
    lcd.setCursor(0,0);
    lcd.print("KM4NMP.COM Keyer");
    lcd.setCursor(0,1);
    lcd.print( WordPerMin );
    lcd.print(" WPM");
  }
   if (WordPerMin > 35){
    WordPerMin = 35;
    lcd.clear();
    lcd.setCursor(0,0);
    lcd.print("KM4NMP Keyer.COM");
    lcd.setCursor(0,1);
    lcd.print( WordPerMin );
    lcd.print(" WPM");
  }
 //calculate dot time
  CharPerMin = WordPerMin * 50;
  dotTimeSec = 60 / CharPerMin;    //dot time in seconds
  dotTime = dotTimeSec * 1000;     //dot time in milliseconds
  dashTime = dotTime * 3;          //dash time

  lcd.setCursor(0,0);
  lcd.print("KM4NMP.COM Keyer");
  lcd.setCursor(0,1);
  lcd.print( WordPerMin );
  lcd.print(" WPM");

  if (LeftPinState == 1) {
    Serial.print("left ");         //for debugging
    Serial.println(LeftPinState);  //for debugging
    tone(audio, note);             //start tone
    delay(dotTime);                //tone length
    noTone(audio);
  }

  if (RightPinState == 1) {
    Serial.print("Right ");         //for debugging
    Serial.println(RightPinState);  //for debugging
    tone(audio, note);              //start tone
    delay(dashTime);                //tone length
    noTone(audio);
  }
  delay(dotTime);                   //time between tones

  if (memoryButtonState == 1) {    //memory button
    //k
    tone(audio, note);              //start tone
    delay(dashTime);                //tone length
    noTone(audio);
    delay(dotTime);
    tone(audio, note);             //start tone
    delay(dotTime);                //tone length
    noTone(audio);
    delay(dotTime);
    tone(audio, note);              //start tone
    delay(dashTime);                //tone length
    noTone(audio);

    delay(dashTime);
    //m
    tone(audio, note);              //start tone
    delay(dashTime);                //tone length
    noTone(audio);
    delay(dotTime);
    tone(audio, note);              //start tone
    delay(dashTime);                //tone length
    noTone(audio);

    delay(dashTime);
    //4
    tone(audio, note);             //start tone
    delay(dotTime);                //tone length
    noTone(audio);
    delay(dotTime);
    tone(audio, note);             //start tone
    delay(dotTime);                //tone length
    noTone(audio);
    delay(dotTime);
    tone(audio, note);             //start tone
    delay(dotTime);                //tone length
    noTone(audio);
    delay(dotTime);
    tone(audio, note);             //start tone
    delay(dotTime);                //tone length
    noTone(audio);
    delay(dotTime);
    tone(audio, note);              //start tone
    delay(dashTime);                //tone length
    noTone(audio);

    delay(dashTime);
    //n
    tone(audio, note);              //start tone
    delay(dashTime);                //tone length
    noTone(audio);
    delay(dotTime);
    tone(audio, note);             //start tone
    delay(dotTime);                //tone length
    noTone(audio);

    delay(dashTime);
   //m
    tone(audio, note);              //start tone
    delay(dashTime);                //tone length
    noTone(audio);
    delay(dotTime);
    tone(audio, note);              //start tone
    delay(dashTime);                //tone length
    noTone(audio);
    delay(dashTime);

   //p
    tone(audio, note);             //start tone
    delay(dotTime);                //tone length
    noTone(audio);
    delay(dotTime);
    tone(audio, note);              //start tone
    delay(dashTime);                //tone length
    noTone(audio);
    delay(dotTime);
    tone(audio, note);              //start tone
    delay(dashTime);                //tone length
    noTone(audio);
    delay(dotTime);
    tone(audio, note);             //start tone
    delay(dotTime);                //tone length
    noTone(audio);
    delay(dashTime);
 }
}
Links
https://km4nmp.com/2019/06/09/basic-arduino-keyer/
https://km4nmp.com/2019/03/31/arduino-morse-code-practice-oscillator-project/
https://km4nmp.com/2019/04/06/arduino-oscillator-with-morse-code-decoder/
https://www.ardumotive.com/i2clcden.html
https://www.arduino.cc/reference/en/language/functions/advanced-io/tone/
Latest Posts

I notice you are not debouncing the buttons. This WILL cause problems. Here is how I do it:
/********************************************************
function to read analog pins as debounced digital inputs
works with 10k pull up and 0.01 or 0.1 ufd cap across switch
has 33 percent hysteresis.
Beware this will spin forever on an unterminated analog input
********************************************************/
boolean Button(int Bpin) {
// Force an initial analogRead
int level = 600; // middle of dead zone
while (level > 400 && level = 800) {
return HIGH; // in upper third
}
else {
return LOW; // in lower third
}
}
The way it works is, I connect a button to an Analog input. There is a 10-20k pull up resistor on the input and a .01 or .1 ufd capacitor across the switch. That capacitor will charge or discharge relatively slowly and smooth over any contact bounce. The Button function watches the voltage on the pin and waits for it to be in the upper third or the lower third of the analog range to declare a high or low. I’ve had very little trouble with switch bounce since using this function.. Only the worst of switches will glitch, they vary a lot.
LikeLike
For this project to keep it simple, the delays built into the sketch are kinda acting as the debounce. If the unit is set at 35wpm there is at least 34 ms before the next read. In this case, there is enough time between reads for the switch to settle down. There is no interrupt so once pressed any activation is ignored until the loop goes around. This project will be modified over time and later versions will have a debounce similar to what you use. There a lot of ways to do the debounce and In the future, there will be a post of several different methods of debouncing. This may be sooner than later, My project that controls the RCS-10 antenna switch will require an interrupt for some functions that I am adding.
LikeLike