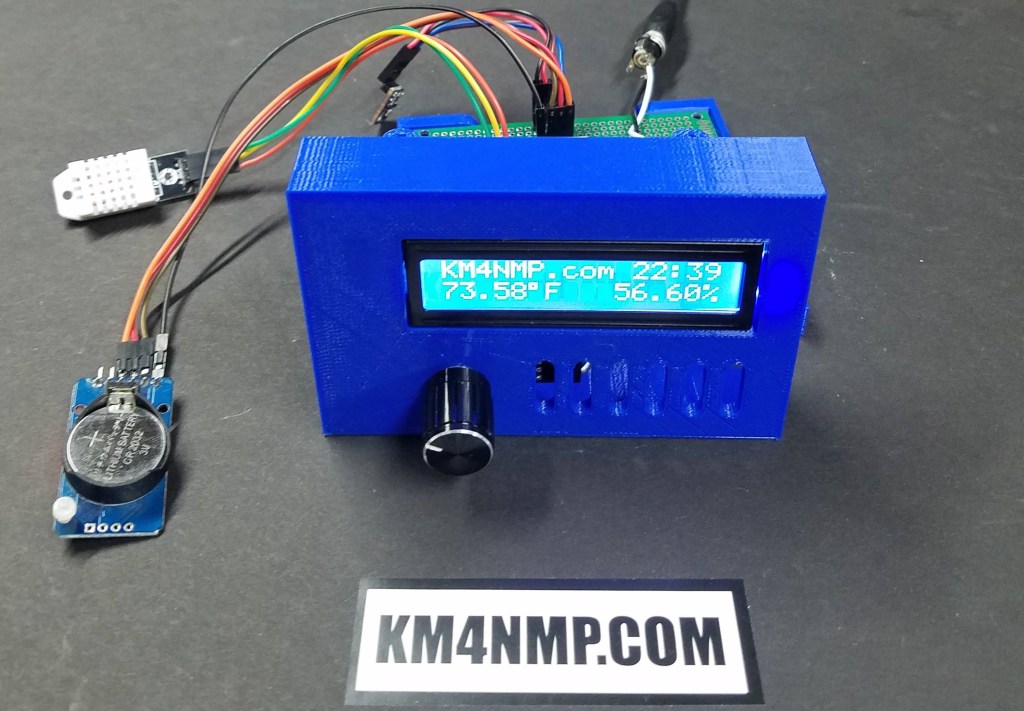
A nice addition to the Basic Weather Station is a Real Time Clock. For this project we will be using the DS3231 Real Time Clock Module. Since the LCD screen is I2C this module should be easy to install. Basically we just add the Real Time Clock to the I2C data bus. I am using 3.3v to power the clock.

Before programming make sure the library for the Real Time Clock is installed. Search in the library manager for “RTClib by Adafruit”. Once installed the Sketch can be compiled and loaded.

Basic Weather Station with Real Time Clock Sketch
//Basic Weather Station Using D1 Mini pro 10/13/19
//Real Time Clock added 10/26/19
//https://KM4NMP.com/
//For the I2C LCD library used and installation instructions use link below
//https://randomnerdtutorials.com/esp32-esp8266-i2c-lcd-arduino-ide/
//For the DHTesp Library use link below
//https://github.com/beegee-tokyo/DHTesp/archive/master.zip
//Real Time Clock Library used is RTClib by Adafruit. to install search in
//the Library Manager and click install

#include "DHTesp.h"
#include "RTClib.h"
#include <LiquidCrystal_I2C.h>

RTC_DS3231 rtc;

int lcdColumns = 16;
int lcdRows = 2;
bool state=0;
unsigned long previousMillis = 0;
const long interval = 2000;


LiquidCrystal_I2C lcd(0x27, lcdColumns, lcdRows);

DHTesp dht;
void setup() {


#ifndef ESP8266
  while (!Serial); // for Leonardo/Micro/Zero
#endif

Serial.begin(9600);

  dht.setup(14, DHTesp::DHT22);
  lcd.init();
  lcd.backlight();
  lcd.setCursor(0, 0);
  lcd.print("KM4NMP.com");

  if (! rtc.begin()) {
    Serial.println("Couldn't find RTC");
    while (1);
  }


    //SET DATE AND TIME TO COMPILE TIME
    //rtc.adjust(DateTime(F(__DATE__), F(__TIME__)));
    // This line sets the RTC with an explicit date & time, for example to set
    // January 21, 2014 at 3am you would call:
    //rtc.adjust(DateTime(2019, 10, 26, 3, 0, 0));

    DateTime now = rtc.now();
    lcd.setCursor(11, 0);
    if (now.hour() >= 10 ) {      //check hours if 10 or above and print hours
      lcd.print(now.hour(), DEC);
      lcd.print(':');
    }

    if (now.hour() <= 9) {        //check hours if 9 or below
      lcd.print("0");             //if needed 0 is printed before hours
      lcd.print(now.hour(), DEC);
      lcd.print(':');
    }

    if (now.minute() >=10) {          //checks if minutes are 10 or above
      lcd.print(now.minute(), DEC);
    }

     if (now.minute() <=9) {         //checks if minutes are 9 or below
      lcd.print("0");                //if needed prints 0 before minutes
      lcd.print(now.minute(), DEC);
    }

}
void loop() {
    unsigned long currentMillis = millis();
    DateTime now = rtc.now();

    lcd.setCursor(11, 0);
    if (now.hour() >= 10 ) {
      lcd.print(now.hour(), DEC);
      lcd.print(':');
    }

    if (now.hour() <= 9) {
      lcd.print("0");
      lcd.print(now.hour(), DEC);
      lcd.print(':');
    }

    if (now.minute() >=10) {
      lcd.print(now.minute(), DEC);
    }

     if (now.minute() <=9) {
      lcd.print("0");
      lcd.print(now.minute(), DEC);
    }


  if (currentMillis - previousMillis >= interval){ //checks time elapsed since last read
    float h = dht.getHumidity();                   //get humidity
    float t = dht.getTemperature();                //get temperature
    float f = t*9/5+32;                            //change temp to F
    lcd.setCursor(0, 1);
    lcd.print(f);                                  //prints temp
    lcd.print((char)223);                          //character for derees
    lcd.print("F   ");
    lcd.print(h);                                  //prints humidity
    lcd.print((char)37);                           //special character for%
    previousMillis = currentMillis;                // resets time of last read
  }


}

Once loaded our Basic Weather Station will display the time in the 24 hour format. There are instructions in the sketch for setting the time. The easiest way to set the time is to uncomment the line that sets the time to the compile time. After you set the time recomment the line and reload the sketch. If you do not reload the sketch, After every reboot the time will be set to the compile time.
The Rotary Encoder in the picture is for future use. In the future a menu will be added to set the time and time format.
Links
https://km4nmp.com/2019/10/13/basic-weather-station-using-a-d1-mini-pro/
https://km4nmp.com/2019/05/11/lm7805-regulated-5-volts/
https://wiki.wemos.cc/products:d1:d1_mini_pro
Latest Posts
- 2:1 Balun For 2m/6m
- 1:1 Choke For 2m and 6m
- 2m Delta Loop Ver 2
- 2m Delta Loop
- Finishing The 6m Delta Loop With 2:1 Balun


1 thought on “Adding a Real Time Clock to the Basic Weather Station”